MVVM Light binding to iOS UITableViews with Xamarin
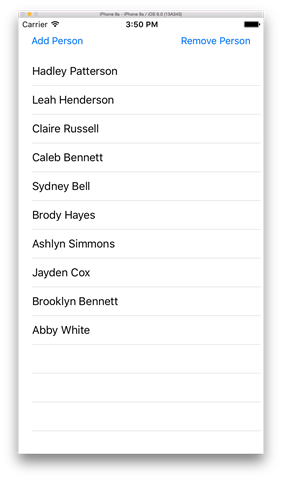
This post will focus specifically on how to bind collection of data to a view. In another post I already focused on how to use bindings for data entry, be sure to read that one to get more insight into data binding under iOS with MVVM Light. In this post we will display a list of people using the standard UITableView iOS UI control. Via two buttons we will be able to add or remove a person. The people will be randomly generated by a service but first things first. Let’s start by creating the view.
Model
The people are generate with the help of the NameGenerator.cs, which is a class that generates random first- and last names.
// As found on https://digitaltoolfactory.net/blog/2012/04/how-to-make-a-random-name-generator-in-c/
public static class NameGenerator
{
    public static Random rnd = new Random();

    public static string GenRandomLastName()
    {
        List<string> lst = new List<string>();
        string str = string.Empty;
        lst.Add("Smith");
        // ...

        str = lst.OrderBy(xx => rnd.Next()).First();
        return str;
    }
    public static string GenRandomFirstName()
    {
        List<string> lst = new List<string>();
        string str = string.Empty;
        // male
        lst.Add("Aiden");
        // ...

        //female

        lst.Add("Sophia");
        // ...

        str = lst.OrderBy(xx => rnd.Next()).First();
        return str;
    }
}
This class will be accessed form the view models, but let’s first setup the view.
View
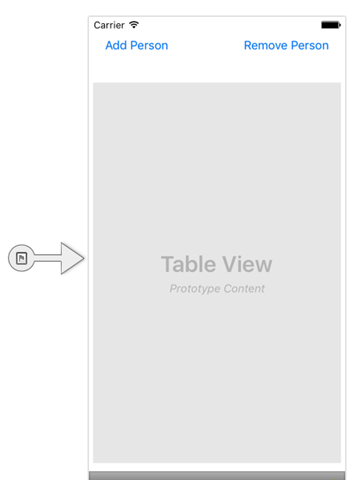
The view consists of a UITableView and two UIButtons which we add in the Storyboard and name them PeopleTableView, AddPersonButtonand RemovePersonButton.
After setting up the view next thing on the list is creating the view model.
View Model
In the view model we implement an ObservableCollection to hold the list of people and two RelayCommands which when invoked add and remove a person from the list:
public class MainViewModel : ViewModelBase
{
    public MainViewModel()
    {
        AddPersonCommand = new RelayCommand(AddPerson);
        RemovePersonCommand = new RelayCommand(RemovePerson);
    }

    public RelayCommand AddPersonCommand { get; set; }
    public RelayCommand RemovePersonCommand { get; set; }
    public ObservableCollection<Person> People { get; private set; }

    public async Task InitAsync()
    {
        if (People != null) return;

        People = new ObservableCollection<Person>();
        var people = await InitPeopleList();
        foreach (var person in people)
        {
            People.Add(person);
        }
    }
}
The list data is initialized asynchronously in an initialisation method. Now what is left to do is connect the view model with the view via bindings.
Configuring Bindings
The bindings are setup in the RootViewController.cs, which is attached to the View which we are about to populate and interact with. The command bindings are implemented in the ViewDidLoad method:
public override async void ViewDidLoad()
{
    base.ViewDidLoad();

    await Vm.InitAsync();

    // Setup bindings
    AddPersonButton.SetCommand("TouchUpInside", Vm.AddPersonCommand);
    RemovePersonButton.SetCommand("TouchUpInside", Vm.RemovePersonCommand);
}
The UITableView’s source is set in the ViewWillAppear method - if done in the ViewDidLoad method you will be initially showed nothing until you start scrolling the blank list.
public override void ViewWillAppear(bool animated)
{
    base.ViewWillAppear(animated);

    _tableViewController = Vm.People.GetController(CreatePersonCell, BindCellDelegate);
    _tableViewController.TableView = PeopleTableView;
}
In the CreatePersonCell method the cell we will display gets created.:
private UITableViewCell CreatePersonCell(NSString cellIdentifier)
{
    return new UITableViewCell(UITableViewCellStyle.Default, "Gnabber");
}
In case you are wondering: “But what about cell recycling?”. Well there is some good news, MVVM Light takes care of that for you. That being said currently (version 5.1.1) does not support multiple cell templates for one collection.
The BindCellDelegate sets the content of the cell:
private void BindCellDelegate(UITableViewCell cell, Person person, NSIndexPath path)
{
    cell.TextLabel.Text = person.FullName;
}
When all is setup we can start up the app you will be able to add and remove people to the list without having to react any further to the events or updating the table source any further.
Conclusion
In this post you saw how you can bind a list of data to an iOS UITableView. Further demonstration showed how easy it is to change the content of the list and updating the UI with the new data. MVVM Light not only allows to integrate your view models nicely in under iOS but only provides some nice little helpers when it comes down to creating an iOS TableSource.
Thanks again to Laurent Bugnion providing us with this great library.
You can find the whole sample on GitHub.


