Getting started with Xamarin Test Cloud and Xamarin.Forms
Automatically testing apps is not only a huge time saver but it also ensures that bugs introduced into the system get quickly caught. This leads to a shorter timespan to fixing these bugs since the memory of what has changed is still fresh in the head of the developers so overall shorter time means less money spent on hunting down bugs and more time to implement the next juicy feature. When developing a Xamarin application one can choose to run the Unit- and Integration Tests on a device/simulator to get a feeling how the logic will behave and perform in the real world. But with Xamarin Test Cloud we can go one step further and test the UI i.e. the entire stack of the application automatically. If you are interested into a general introduction into the topic I recommend you read this post before diving into the technical details of the lines to follow.
For writing a Xamarin Test Cloud (XTC) test the Xamarin Toolchain has to be installed. This post was written using Visual Studio 2015 Update 2.
Having a look at the app
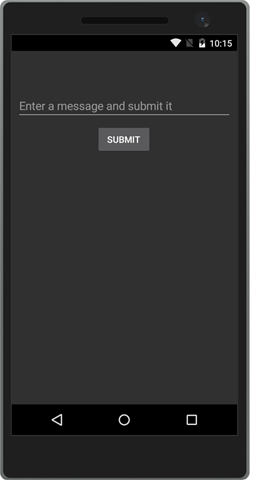
Since this post focuses on writing UI tests the app is rather simple but will show the basic steps required to write maintainable UI tests. The app under test is a basic app with an input field, a button and a button that displays the entry of the input field. The app is based on the MVVM pattern (using MVVM Light) and is based on Xamarin.Forms.
When a user enters a message and submits it, it will appear on the label bellow. Now that the basic outline is defined, lets have a look at how we can implement a UI test for the app.
Writing UI Tests
If you created your Xamarin.Android and iOS projects with UI tests from the beginning you can skip the next steps and just start writing the tests. If not do not despair a few easy steps will allow you start writing those UI tests in no-time.
Setup
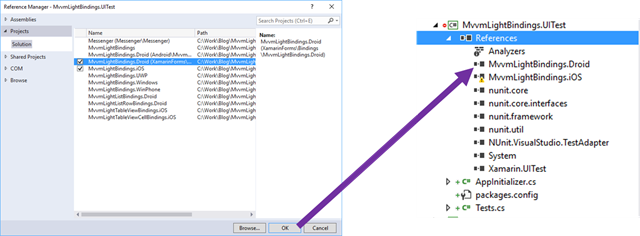
To start writing UI tests we first have to add a UI testing project to an existing project. Simply selecting the UI Test Project will create the Project in the solution. What is still left to do is associate the Project we want to test with the test project. Right click onto References, select the Android and/or iOS Project you want to test and simply add them:
If you take the default UI testing project from Visual Studio you might want to check if you have the latest version for Xamarin Test Cloud. Update XTC to 1.1.0 or higher or else you will get an error when executing the tests which is asking for an API key.
Starting with Xamarin Test Cloud 1.1.0 or higher you no longer need a subscription for Xamarin Test Cloud to execute the tests locally.
iOS and XTC
To run UI tests on iOS there is an additional library required that is included in the app - only the debug version, this will not be deployed to the store. Add the Xamarin Test Cloud Agent package to your iOS Project, then edit the App Delegate to look the following:
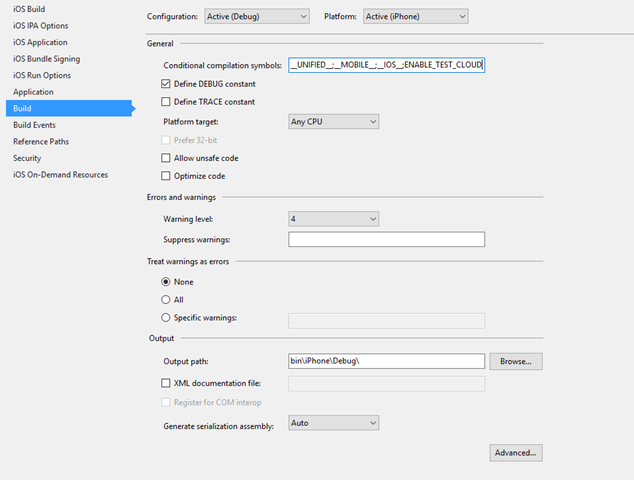
Next open the Properties of your iOS project and ensure that Debug build configuration under the Build tab defines the Symbol: ENABLE_TEST_CLOUD
Now this symbol must only be set for Debug builds. Trying to submit an app with the calabash package included will lead to a rejection when trying to submit the app to the store.
Writing tests
Enough chit chat, lets start writing those tests already. In the UI test project the Tests.cs class file contains the basic setup for a test. Lets change the AppLaunches method to this:
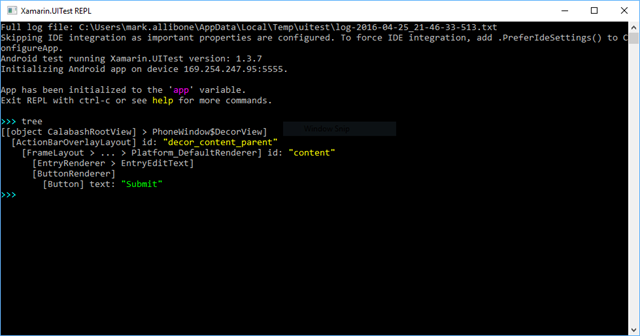
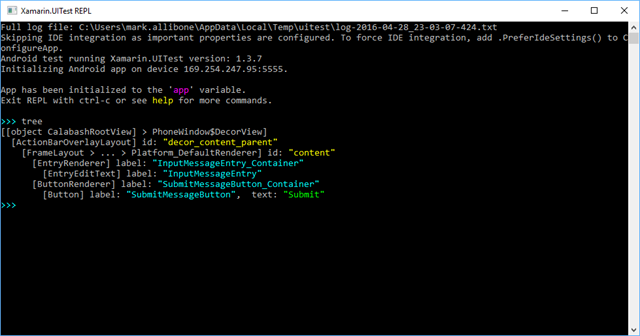
Now when we start the test for i.e. Android the App will be started and a Read Eval Print-Loop (Repl) console will open. One of the most used commands when using the Repl is tree now if we execute the command the following output will be printed:
Now we can identify some of the controls, but it would be a lot better if we could just identify the elements over Ids. So lets just do that. Lets start by adding an AutomationId to all of our controls:
Next we will have to add a couple of lines of code to the AppDelegate.cs in the iOS Project:
And the MainActivity.cs of the Android project:
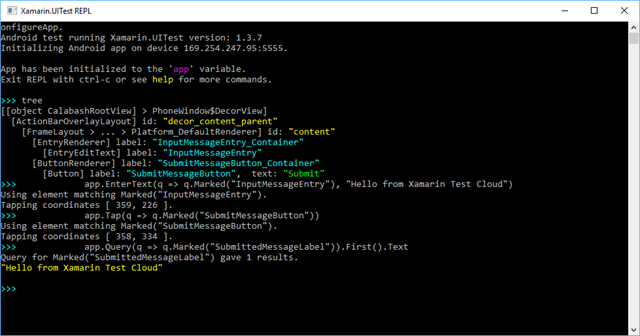
If we rerun the test again and execute the command tree we will now see the following output:
Working against Ids is considered best practice. For instance if the app is required to be available in multiple languages the UI test will work when the device is set to a different locale and can be used to acquire screenshots
In the Repl, we can now type in the following commands which will write a text in the Entry control, then submit the message and read out the text value of the label displaying the last submitted message:
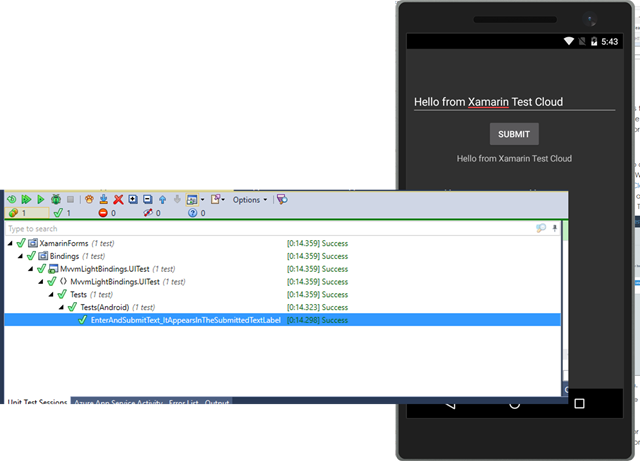
One can use the copy Repl command to copy all of the executed commands to the clipboard (the tree command will be discarded from copying). We can create a new test method and simply paste the copied commands from the Repl. Add an Assert for the Text input et voila, we have created our first basic UI test. 
Now the test has been added with some additional lines that capture a screenshot of the app. These screenshots can be of great value when not observing the test while it is running. And since automation is all about freeing up the human to do other tasks you should enable your tests to take a screen shot after any meaning full step.
Please note that taking screenshots does increase the runtime of your tests slightly so you might want to enable a global constant which allows you to easily en- i.e. disable the screenshots.
Further when running your tests on the Xamarin Test Cloud the screen shot will allow you to get a lot more information about each step such as CPU & RAM usage at the time of the screenshot. So it also allows you to get more telemetry of the app when the screenshot is taken. The string you pass to the method will also appear as under the test.
Executing Tests
After creating the test we can run it on either Android or iOS. Per default the IDE settings are taken for executing the test so it is possible to select different emulators e.g. in Visual Studio you can select different Android Emulators to execute the tests on. If one hooks a device to the computer it is even possible to execute the test on the device. Again for all this there are no licenses required. The tests are base on NUnit, so as long as a NUnit Testrunner is installed the tests should just simply execute.
At the time of writing this blog post the iOS execution is only possible on a Mac.
A small side note regarding the execution time of the test. Due to the fact that the app has to be deployed and then executed on the device the test takes a couple of seconds to run through. If we would think about an Integration Test performing the same task we would have a much shorter runtime, but would not be able to see if the information is correctly displayed on the screen for the user. Just keep in mind that UI Tests in general take a while longer to perform the same test that a integration test would need and that it is worth to choose beforehand which tests to execute.
Running in the cloud
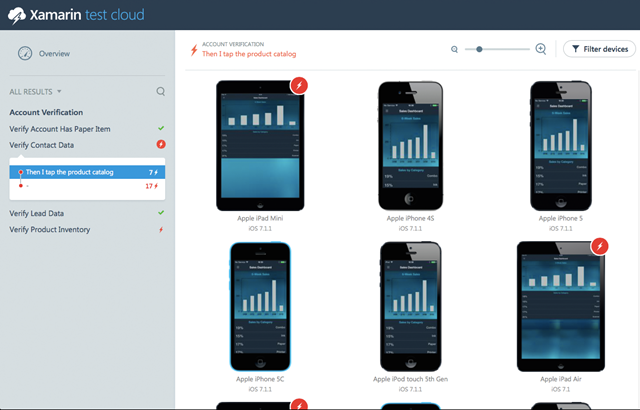
As stated before it is possible to execute the tests locally. This could even be integrated into an automated build process. But there are some limitations when executing the tests locally. For instance if we decide to attach a device we have to maintain that device. Ever heard of bloated batteries, broken cables and the like? Well those things can/will happen, further it is not possible to parallelise the tests locally out of the box. Another aspect is easily adding devices to the test set, well all this is what is the great strength of running your tests on Xamarin Test Cloud. Running the tests on the Xamarin Test Cloud can easily be integrated into a build server and allows to easily run the app on multiple devices (in parallel) and even allows to parallelize the execution of tests on multiple devices of the same type. So in short Xamarin Test Cloud offers a wide collection of devices with different OS versions that do not have to maintained and choosing which devices to use during the tests can be easily configured and changed. The results are displayed on a dashboard:
There is even an API that allows to control the execution and collect the results of a test run.
Currently there are still some details missing from being available for the extraction. Such as the snapshots taking during a test run. If you would like the team to add this or other features please feel free to rate it up or tell them here.
Conclusion
In this blog post we saw how a UI Test based on Xamarin Test Cloud is created. How the UI for Xamarin.Forms should be adapted to make writing of UI tests more robust. Further we saw how we can configure the tests to capture screenshots from steps performed during a test run. Capturing screenshots of a test run not only allows to see more easily where a functional error occurred but also allows to see how the screen looks for a given device and if the layout is behaving as expected.
You can find the sample project and the test code on GitHub.
HTH


