Developing for an IoT device
So a while back I posted about a little pet project I am working on along the lines of how hard can it be. To see the big picture, you can read the overview here. The first step is writing an Internet of Things (IoT) client app that runs on a device and sends sensor readings to the cloud. In the cloud, the Azure IoT Hub manages the client and also receives the data from the client.
As the name implies, IoT devices connect to the internet. So not so different than your client app you might think at first. But when you start thinking about how IoT devices are deployed and run in the wild, there quite a few differences setting them apart. For one, the devices are usually not operated by a person. It’s not a bring your own device (BYOD) scenario, the creator of the IoT device is generally in control of the software running on the device. Being in control also means that the device gets set up by the manufacturer and connects to the backend without or little human interaction. Since the device is out in the open and connected to the internet. It is generally a good idea if not mandatory to have a plan to update the device should a security breach such as Heartbleed ever occur. Though generally speaking the problems are often a lot more homegrown as this post from Troy Hunt nicely summarises. Another aspect that often arises with IoT solutions is the volume of data that has to be processed. While you can process data on the edge (on-site) - usually the desire is here to aggregate the data at a central point and act upon the live data or analyse the data in hindsight to find insights. It is often the data processing scenarios that bring the most significant business value and therefore are an essential part of the solution one tries to create with IoT solutions. Providing the developers with the challenge of creating a system that accomplishes to scale to meet the high data volumes running through the system. In short it is a different world than your traditional Xamarin, WPF, WinForms or Web client app.
The backend plays a significant role in IoT device scenarios. Therefore it comes at no surprise that you will find a lot of companies wanting to help you with your IoT endeavours. One of the solutions is the Azure IoT Hub which was created with the IoT challenges in mind. It provides many great features such as scalability to receive data from many million devices simultaneously, different messaging patterns to accommodate always connected vs IoT devices that may only have a connection now and then again. You can not only receive data from your devices with Azure IoT Hub but also send information to the device. It furthermore provides the means to inform your IoT devices that a new software/firmware update is available. And since it is running in the cloud, scalability is baked into the product.
For setting up the IoT Hub, I recommend you follow these instructions.
You can create one free IoT Hub instance per account, which is the one I will be using for this blog post.
With the IoT Hub setup, let’s set up our local environment. You can manage your IoT Hub all from within PowerShell - oh yes feel that power of the shell (trying to improve my godfather jokes here…) all you will have to do is install the Azure CLI. Then install the IoT extension. If you did not have the tools already installed, be sure to first login to Azure on PowerShell with the following command:
az login
After being logged in and having the extensions you can do all sorts of stuff right from within PowerShell. For instance, we can create a new device like this:
az iot hub device-identity create --hub-name IoTEndpoint --device-id test-device-01
Note that the --hub-name must equal the name you gave your IoT Hub on Azure. You are free to choose a different name to register your device after --device-id. Once you have a device registered. You can send messages as the registered device:
az iot device send-d2c-message -n IoTEndpoint -d test-device-01 --data 'Hello IoTHub'
No error means success but, another handy command is seeing which messages the IoT Hub is receiving:
az iot hub monitor-events -n IoTEndpoint
If you now open a second PowerShell to send a message as a registered device, you will see IoT Hub receiving the message.
With all the tools installed and having a device registered, we are ready to implement our client. There are more commands which you can use with Azure CLI, you can find the full list of commands here.
Implementing an IoT Client
The Azure IoT Hub provides an SDK which clients can use to communicate. The SDK is available for .Net, Node.js, Python, C and Java. However can’t or don’t want to use the SDK you can manually connect to the IoT Hub over HTTP, MQTT or AMQP.
For my first endeavour, I used the Azure IoT Dev Kit. It is a fantastic value for money - perhaps you even have received one as a gift at an event you attended? The dev kit comes with many sensors, and an RGB LED, display, AUX, a USB- and WiFi-connection. That being said if you do not own a device, you can still get started with the SDK for .Net. The SDK runs on .Net Standard. So you can write a .Net Core client which using the NuGet package.
So we could implement a .Net Core Console app to implement our solution. Note since the library can be installed in a .Net Standard project you could extract all the IoT logic code into a .Net Standard library. Being lazy aka keeping the solution of this blog simple I will implement all of the code directly in the .Net Core project. The first thing we will want to do with our app is to connect to the backend. There are different ways how we can achieve this with the IoT hub. For getting started, we will take the easiest route, which is usually not what you want to deploy to production - i.e. using a connection string with an API key as an authentication mechanism:
var device = DeviceClient.CreateFromConnectionString("HostName=IoTEndpoint.azure-devices.net;DeviceId=test-device-01;SharedAccessKey=THIS-IS-WHERE-THE-SHARED-KEY-WOULD-BE-DISPLAYED");
You can retrieve this connection string from within the Azure Portal under your IoT Hub, IoT devices, in my case test-device-01 and then select either the Primary or Secondary Connection String.
Once connected, we can start to send sensor readings serialized to JSON:
var json = JsonConvert.SerializeObject(measurement);
var message = new Message(Encoding.UTF8.GetBytes(json));

await device.SendEventAsync(message);
Since .Net Standard runs on nearly every OS you can think of, you could extract the code above to run on a Raspberry Pie or Android or INSERT-YOUR-TARGET-HERE using actual sensors. And since the SDK is also available for other languages such as C version, we can use it for writing apps for the Azure Dev Kit.
Can I have the rest of the client code? Yes - if you stick around until the end you will find a link to the full source code of the client on GitHub.
Azure IoT Dev Kit Client
I have to recommend following the official docs by Microsoft on how to set up the Azure IoT Dev Kit with Visual Studio Code, which will show you how to initially set up the device and connect it to the IoT Hub. Word of advice make sure you follow all the steps of the documentation and do not leave out any parts such as installing the USB driver on your Windows machine. Talking out of experience from a friend here of course
Microsoft offers quite a few samples for the Dev Kit. The samples can be loaded directly onto the device using Visual Studio Code. I took some inspiration for the .Net Core Client above from the remote monitoring tutorial - I skipped the Azure stuff since I will want to process the data differently. Only changes I made to the C code was the changing the unit of the atmospheric pressure (atm) to hPa. Oh and of course removing the conversion from Celsius to Fahrenheit- my brain will not compute the imperial system
Note that a lot of IoT devices do not come with an operating system installed due to the restricted resources available on the device. These restrictions are often the reason why many programs are written in C. If you are a .Net developer like myself, you will probably miss a lot of conveniences. Then again you might find some consolidation in the knowledge that your code will be very efficient
Another device that I am looking forward to checking out soon is the Meadow by Wilderness Labs. The great thing about the Meadow is that you can write your IoT client code with C# for the device. Good news is they are open for pre-orders, but you might have to wait in line until all of the Kickstarter campaign supporters have received theirs.
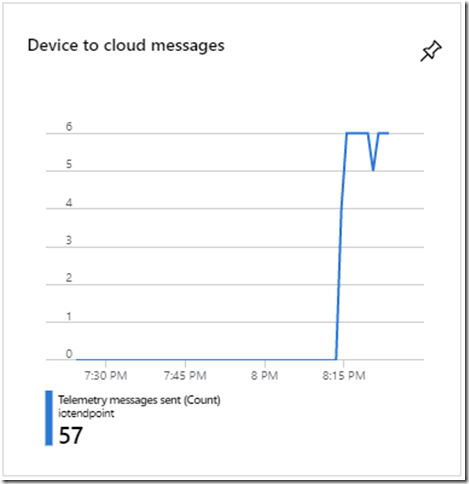
Once you have installed the app on the dev kit and connected it to WiFi, you will be able to see the messages arrive on the IoT Hub dashboard.
And by using the CLI tools command from before we can start a listener that will receive every message sent to the Azure IoT Hub:
You will be able to see the raw JSON coming in on the IoT hub.
Conclusion
Setting up the first IoT device can be a bit of a daunting task since there are a few moving parts. First getting to know the client or even just knowing how to implement a client in .Net Core, then the Azure IoT Hub part. For me, it was good to notice that it is okay to start small and gradually learn the possibilities provided by Azure IoT Hub. But there is still so much more packed into the Azure IoT Hub. For instance updating a device, device twins or communicating from the cloud to a device - if you are interested in a detailed list, be sure to check out the official page here.
In the next blog post of the series, we will look at how to process the data in the cloud. And how to forward it to clients. Where we will visualise the data for the user. So stay tuned and check out all of the client code on GitHub.
HTH


